Image Slider

Showing posts with label design thinking. Show all posts
Wednesday, July 31, 2019

Build a Better Board Game: Spanish & Aztec Style

After we did a teacher-created game for our Renaissance case study, we decided to put the game design into the hands of our students for the Aztec and Spanish study. The Aztec and Spanish case study looks at what happens when two worldviews with very different technology, disease, and worldviews collide. In essence, the Aztecs, though they had a dominant empire in the Americas, were slaughtered and effectively eliminated when the Spanish arrived in Central Mexico.

 We started this project by playing games! We were able to buy a bunch of different strategy games for our lunchrooms. We aimed for games with different mechanics but always a level of strategy. Some favourites were Machi Koru, Santorini, Ticket to Ride, Pandemic, Coup, Letters from Whitecastle, and the classic Catan


Before we played, we did a quick intro to game theory, so the students would be able to identify things like the core engine, game mechanics, and different kinds of games. My student teacher Adrienne created a notecatcher so they could keep track of the terminology. As they played the games, they worked with a group to identify some of the mechanics and core engines of the games they played. They knew, at this point, that they would be creating their own board game and the purpose of the game play was to learn more about possibilities for their own games. 

We used a modified design thinking process to structure our time for this project. The Discovery/Empathy phase was when they played other games to figure out how games work and what makes them fun (and on the flipside, NOT fun!). Students made many observations during this phase about how the best games are easy to learn and play (they decidedly did NOT enjoy the critically acclaimed game Root, because it was too time consuming to learn to play). They made observations about which rules were easiest to follow. They noticed that games were not fun when people were eliminated because then people are sitting around watching until the game is done, which is boring for them. 

After having played several games (we aimed for each group to play 4 - 6 different games) - we played for a whole week, which felt like a long time, but we really wanted them to have a chance to play many different kinds of games. From here, we had the students work through some brainstorming about their own game, and they filled out a Build A Better Board Game organizer. We were really inspired by the Institute of Play's Gamepack resource, and borrowed pieces of them for our process. This part of the process aligned with the Ideation phase of design thinking frameworks. A note here: the result of the conflict between the Aztec and Spanish was known. We did not want their games to present alternate histories (so, if the Aztec won the wars with the Spanish and the history of the Americas would forever be different), but the Spanish did not have to "win." We talked a lot about how there could be different goals for the Spanish and Aztec players: In some games, the students had the Spanish working towards God, gold, and glory, and the Aztec could be aiming to survive for a certain number of rounds. Others decided to focus on one group only: all the players were Spanish, or all the players were Aztec. As I'm reflecting on this now, there's something uncomfortably colonial about this... and I'm not sure what to do about it.

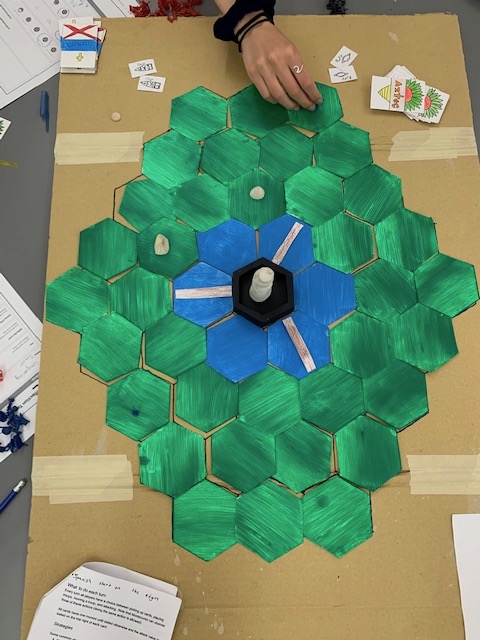
Anyway, they began prototyping their game following ideation. They used lo-fi materials to prototype in the beginning: paper and pencil. They created paper stand-ins for a board, meeples (did you know the little figures you play with on board games are called meeples?? Until this project, I did not!), cards, and rules. We spent just a couple of days creating these lo-fi models, because after this, we had them do a playtest. Groups switched games with another group, and they tested the games to see if they would work, and to see if they would be fun. They used the Playtest Reflection Template on page 31 of the Institute of Play's Game Design Pack to give the group feedback.

Following this, they iterated based on feedback. They changed rules, worked on the clarity of their rulebook, and altered game mechanics. Then they began working on a hi-fi version of their game. They used all kinds of materials like cardboard, paint, clay to make meeples, and our 3D printer. And then they played each others' games! They used the playtest feedback form once again to give the groups feedback as they played.




As we did with our Renaissance project, we used an assessment sheet to keep track of progress towards outcomes as they were working through this process. We once again wanted students to have opportunities to improve throughout this project, and so re-assessment was possible at any point during the work time they had for their game. I think in future iterations of this project, I would simplify the assessment sheet as it had too much to focus on and made mastery more difficult. 

Though it seems simplistic, the amount of content knowledge the students needed to know in order to make these games was quite astounding. They needed to make it historically accurate, and the outcomes had to reflect what really happened. Being able to create within those creative confines enabled great creativity - as you can see, each game is very different. Project-based learning can tend to go one of two ways: frontload the knowledge, and then have students create something to prove they know it, OR craft a performance task that gives the students a reason to find out the knowledge. The second type of project are the kinds I tend to gravitate towards. It works! This project proves that it does!

Resources Shared in this Post:


This project was co-designed with Tara.


Wednesday, July 10, 2019

Me: A User Manual

We started our year in our grade 8 Humanities classes with a design challenge, with a couple of purposes: First, to help us learn about each other, and secondly, to set students up for success in the kind of collaborative work we knew we'd be doing all year. Enter, Me: A User Manual. The idea was for students to create a manual that would help other students know how to best collaborate with them.

I feel like I read about another teacher who did something similar, but after exhaustive Twitter queries, I came up empty. So I don't claim to have invented this idea, but I don't know who to give credit to. If it's you, let me know and I'll credit you!

The design question we aimed to answer through this project was:

How might we communicate so we might bring our best selves in collaborative situations?
We started with a reminder from Brene Brown about the difference between Empathy and Sympathy.

Then, students got into groups of three to do an interview for empathy.

From dschool-old.stanford.edu/wp-content/themes/dschool/method-cards/interview-for-empathy.pdf
The purpose of the interview for empathy was to learn about what gets the person excited, and what they're doing when they are their best selves. We did this in threes so one person could be a notetaker while the interviewer focuses on really digging deep. We had the notetaker use an empathy map to take notes with:
You can find this on Slide 6 in the slidedeck
Next time, I might have the notetaker just take jot notes and then have the interviewer sort those notes and organize them into the empathy map. I think it was a bit too much to pay attention to for the notetaker and the quality of information suffered.

After this, we invited students to bring in an object that they cared deeply about for a show and tell (Note: Eighth graders are AS excited about show and tell as Kindergarteners are). The idea here is that by bringing in a physical object that matters deeply to them, students would be able to drill down into what really matters to them most. We had students again get into a group of three (different from last time), and used a circle protocol for them to share their object. A circle protocol is a method gifted to us by many Indigenous cultures whereby each person has a chance to share, and the rest of the members of the circle witness their testimony silently, without interruption. After they shared, they wrote a quick 3x3 to summarize the object and its importance to them: three lines, with three words each, and it doesn't have to be grammatically correct.

The next day, we did some improv. We wanted to nurture camaraderie, and I'm forever indebted to the dSchool's Stoke Deck, a set of cards with improv games sorted into categories for what you need, be it to energize a group, create focus, get personal, communicate mindsets, or, in our case, nurture camaraderie. We reflected afterwards in our journals about what we learned about ourselves by engaging in these activities.

After this, we honed in on the concept that self knowledge is self care. We used an edited video from School of Life, which you can find on slide 14 in the slidedeck. It introduces the idea that our behaviours sometimes say something that can be misinterpreted by others, and that life would be so much easier if we could come with a user manual that would tell others why we were malfunctioning and how they could troubleshoot this. This is where we first introduced the concept of creating a user manual for ourselves.

We focused first on strengths. We used a beautiful video called 30,000 Days to focus us in on what makes us special, and an accompanying document called the Periodic Table of Strengths from the organization who made the film, Let it Ripple.


They chose a few of the strengths in this table that they felt they demonstrated strongly, and gave examples of how they demonstrate these strengths. We started focusing in on collaborative situations, too, and asked them to think about what strengths they show most strongly in collaborative work.

Then, we reflected on needs, and asked them to think about behaviours they show during group work, why they do them, and what might help troubleshoot this behaviour. For example, "Behaviour: I might not jump in with ideas right away because I need time to process and think. Solution: Give me some time to think about things before asking my opinion."

Then, we had the students look at a bunch of actual user manuals, using post-its to list what they noticed about language, about visuals, and about format. From these noticings, students created lists of features they'd include in a user manual about themselves. Then, we speed-dated to ideate, where the students shared ideas of things they'd include with each other, and added to their own lists based on good ideas they got from classmates.

After this, they prototyped a low-fi version of their manual, which they shared with a group. Then we had them collaborate with this group on a task related to another curricular area, and tested how the user manuals worked to help make group work meaningful. They spent some time reflecting on what they learned through the test, what they needed to add and iterate, and then they started working on high-fi versions of their manual, using this success criteria that was aligned with the standards (stems) we needed to assess:


  • Communicates personalized likes, dislikes, and preferences for working in a group. (Stem 7)
  • Communicates potential challenges and solutions (troubleshooting) when working in a group. (Stem 7)
  • Is formatted to reflect the look and feel of a user manual. (Stem 2)
  • Language and word choice is formal and appropriate to the genre of a technical manual. (Stem 2)
  • Uses visuals and diagrams to support and enhance the text. (Stem 10)
  • Reflects on and articulates the learning process, particularly in how information was evaluated and decisions were made to curate the final product. (Stem 3)

There are some big iterations needed in this project next year. I think this project would be a lot more purposeful and meaningful if we started by looking at user manuals, what and how they communicate meaning, and then did the design thinking process, stopping after each exercise to build out a page of their manual. Our hope was that the discovery/empathy work they did by interviewing each other, exploring treasured objects, doing improv, and identifying strengths and areas of need would transfer over into the actual manuals, but this was not consistent amongst our students. We underestimated the amount of scaffolding some of our students needed to be able to do this successfully. The building blocks to this project are good ones, but they needed to be built out bit-by-bit, as Angela Stockman would say. We needed to define what the blocks of a user manual are, and then create within them. That's work to revise for next year.

Another big change I'd make would be to purposefully use the user manuals in collaborative work for the rest of the year. This was the intention, but it didn't end up happening. I'd take the time to print, laminate, and bind the user manuals and would incorporate them into norm-setting activities at the beginning of any collaborative project from that point forward.

Resources to share from this project:

Note: Once again, this project was developed with Tara, my amazing teaching partner.
Saturday, October 14, 2017

Designing a Classroom Culture

Middle schoolers can sometimes be mean. When someone is different from them, they sometimes react by excluding them even further.

But. I also know these young people to be extremely compassionate, infuriated by injustice, and endlessly kind. It was my desire to bring this side of my grade 7 students to the forefront of the fabric of our classroom this year.

Instead of dictating a series of classroom expectations or guidelines, I decided to leave this up to my students this year. To do this, I turned to design thinking. During my visit to IDEO last year, something an IDEOer said stood out to me:

You can't design culture. But you can design things that impact culture.

An IDEOer who is a systems designer showed us this video:


So I wondered: what is the milk in our classroom that will get our Scotties, or our students, moving together?

I started by loading us all up with inspiration. I looked for examples of workplaces and classrooms with vibrant, collaborative cultures. I looked for inspiration where wonder, curiosity, and character were at the forefront.

Here's what we did:
After we'd saturated our brains with all this inspiration, we use the Innovator's Compass to make sense of everything we'd learned to design an experiment we could try.

At this point, I introduced a How Might We question. Eventually, my students will be the ones coming up with the HMW question, but this early in the school year, I scaffolded this step for them. Our question was:

How might we design a classroom culture where everyone belongs?


We used the Innovator's Compass to identify what was already happening in our classroom culture (Discover Observations) and then understand what we need next in order to create a culture of belonging (Design Principles).

Sidenote: At this point, I ran my own design experiment. For a couple of days, we renamed our classroom "Quoogle" (Quinn + Google). We used our observations from the article we read about Google to organize our classroom: students could choose the order in which they wanted to do their tasks, students could monitor their bodies to decide when they needed to take a quick body break, and there was a high level of trust and a high level of accountability in getting work done. Students came to work with me in small groups (they decided when, of course) at the Innovator's Compass. After a couple of days, I sought the students' feedback about how the experiment went, using my own observations as data points, too. They loved being able to choose the order in which they did their tasks, but didn't like that I wasn't available to answer questions or support them in independent tasks because I was working with small groups at the Innovator's Compass. They decided that Quoogle would be a good way to work when students were doing independent work, but not small group or whole class projects.

Apologies for the laminator glare.

From there, students got into groups of three. They chose one Post-it from the Design Principles section of the Compass. These were things like, "We need to communicate" or "Everyone needs to feel valued" or "We need to really know one another." Then, they Dreamed Ideas. They came up with lots and lots of ideas about how we could make this need become a reality. They used these Brainstorming Rules to help them here. They drew from the inspiration we gained through the Discovery/Empathy phase of the design process to give them ideas. They diverged as they dreamed big and let wild and crazy ideas be okay.

Then, they narrowed their ideas, by refocusing on the Post-it they chose from Design Principles. They selected one idea that met this need, and got to work Designing an Experiment they could try in our classroom. They also designed a way to get feedback: was the prototype successful in doing what they intended?

Every few days, we're trying another experiment.

One group came up with a plan to get students to know one another by sitting next to a different student each day and learning three new things about them.
A chart to keep track of who each student has sat beside and what they learned about them.

Another group wanted to make positivity the main mode of being in our room. They created a "Positivi-tree," where students can attach positive statements and compliments about one another.

Another group developed a process that students can use to help one another if they are stuck.


One group, inspired by Google's cafes, wanted us to eat together. Most days, students disperse in a lunchroom and eat with friends from other classes. One day last week, this group of students booked a conference room, and we sat around a big table, eating our lunches and chatting with one another about things unrelated to learning. They wanted us to have a chance to get to know one another as people, rather than as learners. They sought feedback from their classmates, and learned that most students really liked the opportunity to break bread together, and thought it would be a good idea if we did this once a month.

Whether these experiments are working or whether I've just got a group of really kind students, anecdotally, my classroom is becoming a place where kindness is the way to be. They have been so supportive of one another. When one student in my other class won first place at a cross country running meet, my other class decided she needed to be celebrated, and we all snuck over to the other classroom to give her a standing ovation. 

What I'm learning is that my students absolutely can be trusted to make collective decisions about the way our classroom works. When students feel like they have agency over the way we work and learn together, they are more likely to be respectful of the norms they create. This is such an obvious realization that it seems almost silly for me to write it, but it's so absolutely not the case in many classrooms. But if we just let our students be our teachers, we will learn so much.


Sunday, November 06, 2016

Inspired by the Teachers Guild

A couple of weeks ago, I had the humbling honour to visit the Teachers Guild at IDEO's San Francisco offices.


The Teachers Guild is an online collaborative environment where teachers can work together to solve our biggest challenges in education today. The Guild sparks the conversation by offering a design challenge, and teachers go through phases of Discovery, Ideate, Build, and Select. The ideas that are refined through this process have the potential in being built out by industry partners. For example, one of the ideas for a challenge that asked teachers to reimagine parent-teacher interviews was built into a template by Piktochart.

As a recent addition to the coaching team at the Guild, I was invited to join in on a coach's retreat, where we would deepen our understanding of design, hone the craft of coaching, and collaborate with one another.

I was so inspired by my time with the IDEO crew and the other coaches, and wanted to take some time to reflect on my biggest takeaways.
The best quotes from Day 1.


Design Thinking Knows Teachers are the Key to Reimagining Education


The BEST quote of all

There is no one better positioned than teachers to reimagine education. If we accept the idea that everything designed can be redesigned, and that nearly everything about education (if not everything) has been designed by humans, then we have the power to redesign it.


You Can't Design Culture, but You Can Design the Things that Impact Culture

IDEO's office has been carefully designed to influence the culture there. It's a place of collaboration and creativity. 

You know the culture as soon as you walk in.

IDEO's mindsets are posted on the wall in the front entrance.

IDEO values the idea of a prototype, and of iteration. The front desk is currently a prototype made out of cardboard.


IDEO's employees are connected with one another visually so they can collaborate easily. Project nests let teams work on a project together.

The Power of the Post-it. Collaboration, brainstorming, and blue sky thinking.
If we want to create cultures in schools that allow for creative risk taking, we must design our spaces, routines, and ways of being to enable this. A lot of the things we have in schools (take the timetable, for example, or students sorted by chronological age, or even the weekly informational staff meeting) go counter to the kinds of cultures we wish to enable. 


Inspiration is Everywhere

I had read the words "analogous research" in many of IDEO's helpful toolkits (Examples: Design Thinking for Educators, the Field Guide to Human Centred Design, and Design Thinking for Libraries). But I never truly understood what that meant until we did a design challenge on Day 2. 

Our challenge was: "How might everyday spaces invite student curiosity and learning?"

All we knew about our day was that we were to show up at Golden Gate Park. We were teamed up, received challenge cards, and set free to gather empathy at the California Academy of Arts and Sciences and the de Young Museum of Fine Arts.

I've done similar challenges with staffs before, particularly those who were wanting to shift their libraries to learning commons. But now I realize I was doing empathy backwards. I would have staff examine their existing library space, looking for opportunities that could spark curiosity and learning. But now I realize that analogous research means seeking out inspiration in places, people, and things that already do curiosity and learning really well. 

That's why we were at the science centre and art museum. We got out of the ruts of assumption - assuming we know what sparks curiosity and learning in young people - and noticed deeply and observed closely what actually does this.


Coach James testing out the earthquake exhibit at the Cal Academy of Science.
Discovering the immersive experience Cal Academy does so well. How might we create such a sense of awe and wonder in our classrooms?


It's All About the People

It's called human-centred design for a reason. The people are the ones who matter. We are better together than we are apart. It's my belief that it is impossible to be creative in isolation - your idea will never be as interesting as it would be if you collaborated with others.
Some of my fellow coaches, James, Maggie, Michael, and Jess.
Inside James Turrell's Three Gems
I was so inspired by my fellow coaches as the IDEO/Teachers Guild staffers during our time together. I am a better teacher, designer, and person for knowing them.


How You Invite Someone Affects How they Show Up

If we go back to our first takeaway, that teachers are at the heart of educational transformation, then this one is closely related. Teachers need to be invited. They need to be invited in a way that helps them recognize their power and see the optimism in this way of thinking. For those of us who create design thinking experiences for others, inviting them in such a way that helps them see why even engaging in a small way helps us all helps build that 
A small example of how you can make people feel special in being included.

So, you're invited. You're invited to help us reimagine what is possible. You're invited to let your creativity, and the creativity of your students, have free rein. Let's do this. 


Sunday, October 02, 2016

At the Confluence

My creativity is in full practice, though I haven't stopped much to write about it here! I hope to get back into that habit.

I did write an article on Medium for the Teachers Guild about Design the Shift, a summer professional learning event I helped organize. You can find out more about Design the Shift. You can read my article entitled At the Confluence.
Friday, October 09, 2015

Speed Dating an Idea

Written by Erin Quinn

Speed Dating is a concept that came from our professor, Robert Kelly. He wrote about the process in his book, Educating for Creativity: A Global Conversation. I highly recommend this book, by the way.
Speed dating isn't for romance, it's for ideas. Its purpose is to grow ideas and collaborate with others to increase the amount of ideas everyone has.

Step 1: Have your students brainstorm ideas around a topic. When I did this with my students, they brainstormed a list of things they could write about in a book review. When I did this with teachers, we had them share ideas for a task they were designing.

Step 2: Set the chairs in your classroom up in two rows, facing each other. There should be an equal amount of chairs. If you have an odd number of students, you could join in the speed dating too!

Step 3: Have your students choose a chair, bringing their original brainstorming list with them.

Step 4: Set the timer. Depending on what the topic is, the timer could be set for 2 minutes or even 1 minute, or as much as 5 minutes. We did 2 minute intervals the other day.

Step 5: Have the two students opposite each other share their ideas. If one of them brings up a good idea that the other person doesn't have, they should add it to their list. The objective is for each student to grow their list.

Step 6: When the timer rings, have everyone move one seat to the left. The ones at the end of the row will go across to the other side. Continue the idea exchange until you feel your students have enough ideas or they have "dated" everyone.


Friday, September 04, 2015

Design Challenge: How might we redesign the first day of school?

by Stephanie Bartlett

 Think back to your first day of school. What were some of the actions, emotions and experiences that you remember as a student?

Fifty teachers met in late August with CBE Learning Services for a three-day institute on Design Thinking. Participants were given an initial design challenge of “How might we redesign the first day of school?” The dominant themes that emerged from the first round of ideation revealed the necessity of a creating a safe place, the presence of positive and negative emotions, fear of the unknown, routines, the beginning of a journey, friendship and storytelling.


Our group created a point of view statement to help figure out the problem we wanted to solve:
All learners need a way to feel safe because when we belong and feel confident, we are more able to take risks and make discoveries in our learning.

 Why would we want to redesign the first day? The first day is always a new beginning. Teachers create amazing opportunities and get to know you games to help children feel welcome. Paperwork and information gathering is also an essential part of the day. There is always an element of uncertainty and excitement as a new group comes together at the beginning of a school year.

 As I sat down to plan my first day, I reflected on my values as an educator and as a person. What did I want students to feel? What did I want students and their families to know about me? Community is an integral part of my pedagogical beliefs. To teach a child to the best of my ability means that I need to form a relationship with not only the student, but with the parents, so that we can best work with the child. With this belief in mind, I jumped into my redesign.

 I took note of the feedback I received when I told people about the redesign. Comments and questions ranged from negative to positive as they asked me why, pointed out the potential for problems with separation when it became time to say goodbye, or nodded approvingly, saying that it sounded like a refreshing idea. Not one to back away from a risk or change, I forged ahead with my plans. On the day before school started, flowers, plates and snacks were on my to-do list to add to what I hoped was a welcoming classroom.

The most significant change that I made was inviting the parents into the classroom with the students. For the first forty-five minutes of the day, we mingled, shared a snack, and parents explored the classroom with their children. I watched as they sat and played or drew with their children and then began to introduce themselves to other parents.

 When the timing seemed right, I taught everyone our stop signal and asked students and their parents to clean up together and say goodbye to each other. We laughed together when more students than parents heard the stop signal when I used it the first time. We learned to say “au revoir” and then joined each other on the carpet to read a story.

Having a social time to mingle and share food together created the effect I hoped to achieve. Building on the belief that I want to create a safe and happy environment where students can feel comfortable enough to take risks in their learning, this was the first chance of many to model the importance of building a close-knit community. It is my guess that our first experience together smoothed out some anxious feelings of both parents and children. It felt peaceful and invigorating at the same time and I am looking forward to the beautiful year of learning and relationships that lies ahead.

Sunday, September 07, 2014

Grade 7 Final Project | Using Design Thinking | Part 3

by Erin Quinn.
Our kids have gotten down and dirty with prototyping and design thinking over the past few weeks, and now it was time for them to show what they’ve accomplished. So today, we had a celebration of learning where the students showed their models and talked about their idea.
I was so impressed by the students today. Here’s why this interdisciplinary project and design thinking helped them do something pretty incredible:
  • Having a problem that could be viewed through many different lenses (the CTF occupation areas) allowed for multiple entry points, and let students choose a topic that truly interested them.
Multiple topics mean every student can personalize his or her own learning.
  • Students had to learn about their career cluster prior to the moon disaster, and figure out how the science of the moon would affect their topic. Their research was purposeful and they realized its importance because their solution depended on it. We had a short period devoted to research right at the beginning, but most research happened spontaneously throughout because kids had questions that needed answering.
These students had to learn about how batteries work and energy is transferred to design this solution to the problem of not having power.
  • Each occupational area had countless possibilities within it. Students could use what they knew about the science of the moon and planet earth, as well as their idea generation they did at the beginning of the prototyping process, to allow them to find a solution that made sense to them. Because of this, a high number of students were able to speak confidently and accurately about how their solution worked. Most students were also able to explain the science behind their topic, too.

The students who designed this house could explain exactly how it would withstand earthquakes and tsunamis.
  • They’re doing important work. Though the scenario is a bit farfetched (let’s hope a meteor doesn’t hit the moon!), the problems they tackled are very real. These thirteen year olds were coming up with sophisticated solutions to problems like natural disasters, nonrenewable resources, sustainability, and community engagement. The future is in good hands with these kids.
Sustainable agriculture, geopowered air filtration, and making dirty water clean (notice the PH strips – they managed to their their filtered water to be PH neutral!)
  • They could choose if they wanted to go high tech or low tech. Because of the loan from ILT of the Maker Kit, options were available to students who wanted to try some cool technologies like Arduinos, Little Bits, and robotics. But if kids wanted to use good old Lego? That was available too. And cardboard was a popular building supply, too.
Lego Mindstorm Robots and Lego Building Blocks.

  • Kids tried things they had never done before and learned something in the process.
A boy learning how to sew.
  • Lots of things didn’t work. That is part of the design process. Failure is a huge part of it. And learning to be okay with failure – to use it as information for what the next steps should be – was an important lesson many of these students learned. I had a conversation with a group who tried to make a generator, but whatever they tried, it still didn’t work. But they were able to explain exactly why it should work, even though it didn’t. They tried different prototypes and adjusted, and researched, and adjusted, but it still didn’t work. And that was okay.
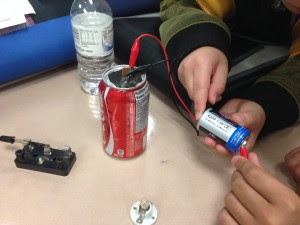
These boys were trying to find a way to store energy. They tried a pop can, a battery, and acid. Here’s how they explained it to me: Student 1: “We used the solution in the can because it has a PH level of 12.”
Student 2: “And because it has electrolytes.”
Student 1: “And electrolytes conduct. And this is zinc, and this is copper [gesturing to the metal plates in the acid solution]. And there’s an aluminum can that is also conductive. And we’re hoping that this will store energy.”
It didn’t. But knowing the PH and conductivity of different solutions and materials and being able to hypothesize that it might work to store energy is a pretty incredible thing for students in grade 7 to understand.

We’re not quite done this project yet. Because all grade 7 students worked on this project, there were three groups in each occupation area. On Friday, Monday, and Tuesday, groups are going to give a final pitch, with the goal of convincing their peers that their solution in the occupation area was the best one. They have created persuasive advertisements and will be giving a two-minute persuasive speech over a video broadcast that will be livestreamed to all the grade 7 classrooms. This part of the project let us more fully integrate Language Arts into this project.
Read Part 1 and Part 2 here.

Grade 7 Final Project | Using Design Thinking | Part 2

by Erin Quinn
I watched a great movie awhile ago called How to Cook Your Life that features a Zen Buddhist chef called Edward Espe Brown. In it, he said, “Cooking brings your hands nourishment because your hands get to be hands instead of playing around with your iPod or computer. They get to do something instead of sitting around all day while you’re entertaining yourself with your iPod and your internet and all of the other things we do. Our hands don’t get to do much any more.”
And then he said, “Your hands activate your brain.”
Well, if you’re using technology to create, I think your hands are doing something important. Here they are, activating their brains by using their hands:

Making a robot out of an Arduino.
How do make dirty water clean? Attempt 1: Not so clean.


Attempt 2: They tasted the water they purified with this solution. They said it didn’t taste bad, but it didn’t taste good either. Getting closer!
Open Beam makes prototyping easy. Fun to see grade 7 students on the floor, so intent.

Read Part 1 and Part 3 here.